The integration between ACI with OpenStack leveraging Opflex has been available for some time now. The following white paper explains this integration and its benefits:
And the documentation explains how to install the Cisco plugin and configure Opflex to function in either ML2, or GBP (or more recently, any of the two using the Unified Plugin). Here is for instance the installation for Red Hat OpenStack:
However, there’s little literature that deep dives into the inner implementation to help operations and troubleshooting. In this post I will try to provide a deeper insight that should help people that are building OpenStack clouds with Cisco ACI troubleshoot their environments.
I will illustrate the concepts with a basic diagram involving two nodes running RDO. In the following diagram, centos-01 runs an all-in-one OpenStack installation, therefore it is the neutron server and also an openstack nova compute node. We complement it with centos-02, running only nova compute node.
We are leveraging the APIC neutron plugin in ML2 mode for SDN integration. This means that we implement distributed routing, distributed switching, distributed SNAT and Floating IP via APIC and the ACI fabric.

In this post I do not cover the installation or configuration. However, the configuration has been done so that we also leverage distributed DHCP and Metadata:


We can use ’neutron agent-list’ to review the list of running agents:

Notice that Open vSwitch agent is disable for both nodes, and that L3 Agent is also disabled since they are not required when using ACI OpFlex integration. Notice also that DHCP agent only runs on the centos-01 node (our neutron server) which is our OpenStack controller, but it is not required on the compute nodes.
On the diagram above you can see a router connected to the fabric via leaf5 and leaf6 and an external switch. We will use this connection to configure an L3Out on the common tenant that will serve for all OpenStack external communications. The following is a snapshot of the L3Out configuration on APIC:

We also have a VMM domain on APIC that allows the fabric administrator to have greater visibility of the OpenStack cloud, here we can see the two hypervisors configured, and an inventory of the networks under the distributed virtual switch implemented by Open vSwitch controlled by APIC:

On OpenStack, I have configured a project called NewWebApps. On the OpenStack Project NewWebApps we have the following topology configured (note that in OpenStack a project is also called a tenant):

We have two neutron networks and a neutron router. We also have an external network called OS_L3Out (matching the L3Out under common tenant). By default, a new ACI tenant is created for each OpenStack Project. Also by default, in ML2 mode, for each tenant a VRF is created and each neutron network will create a Bridge Domain and a matching EPG, with the L3Out having a relation in this case with the common-tenant L3Out via a “shadow L3Out” as shown below:

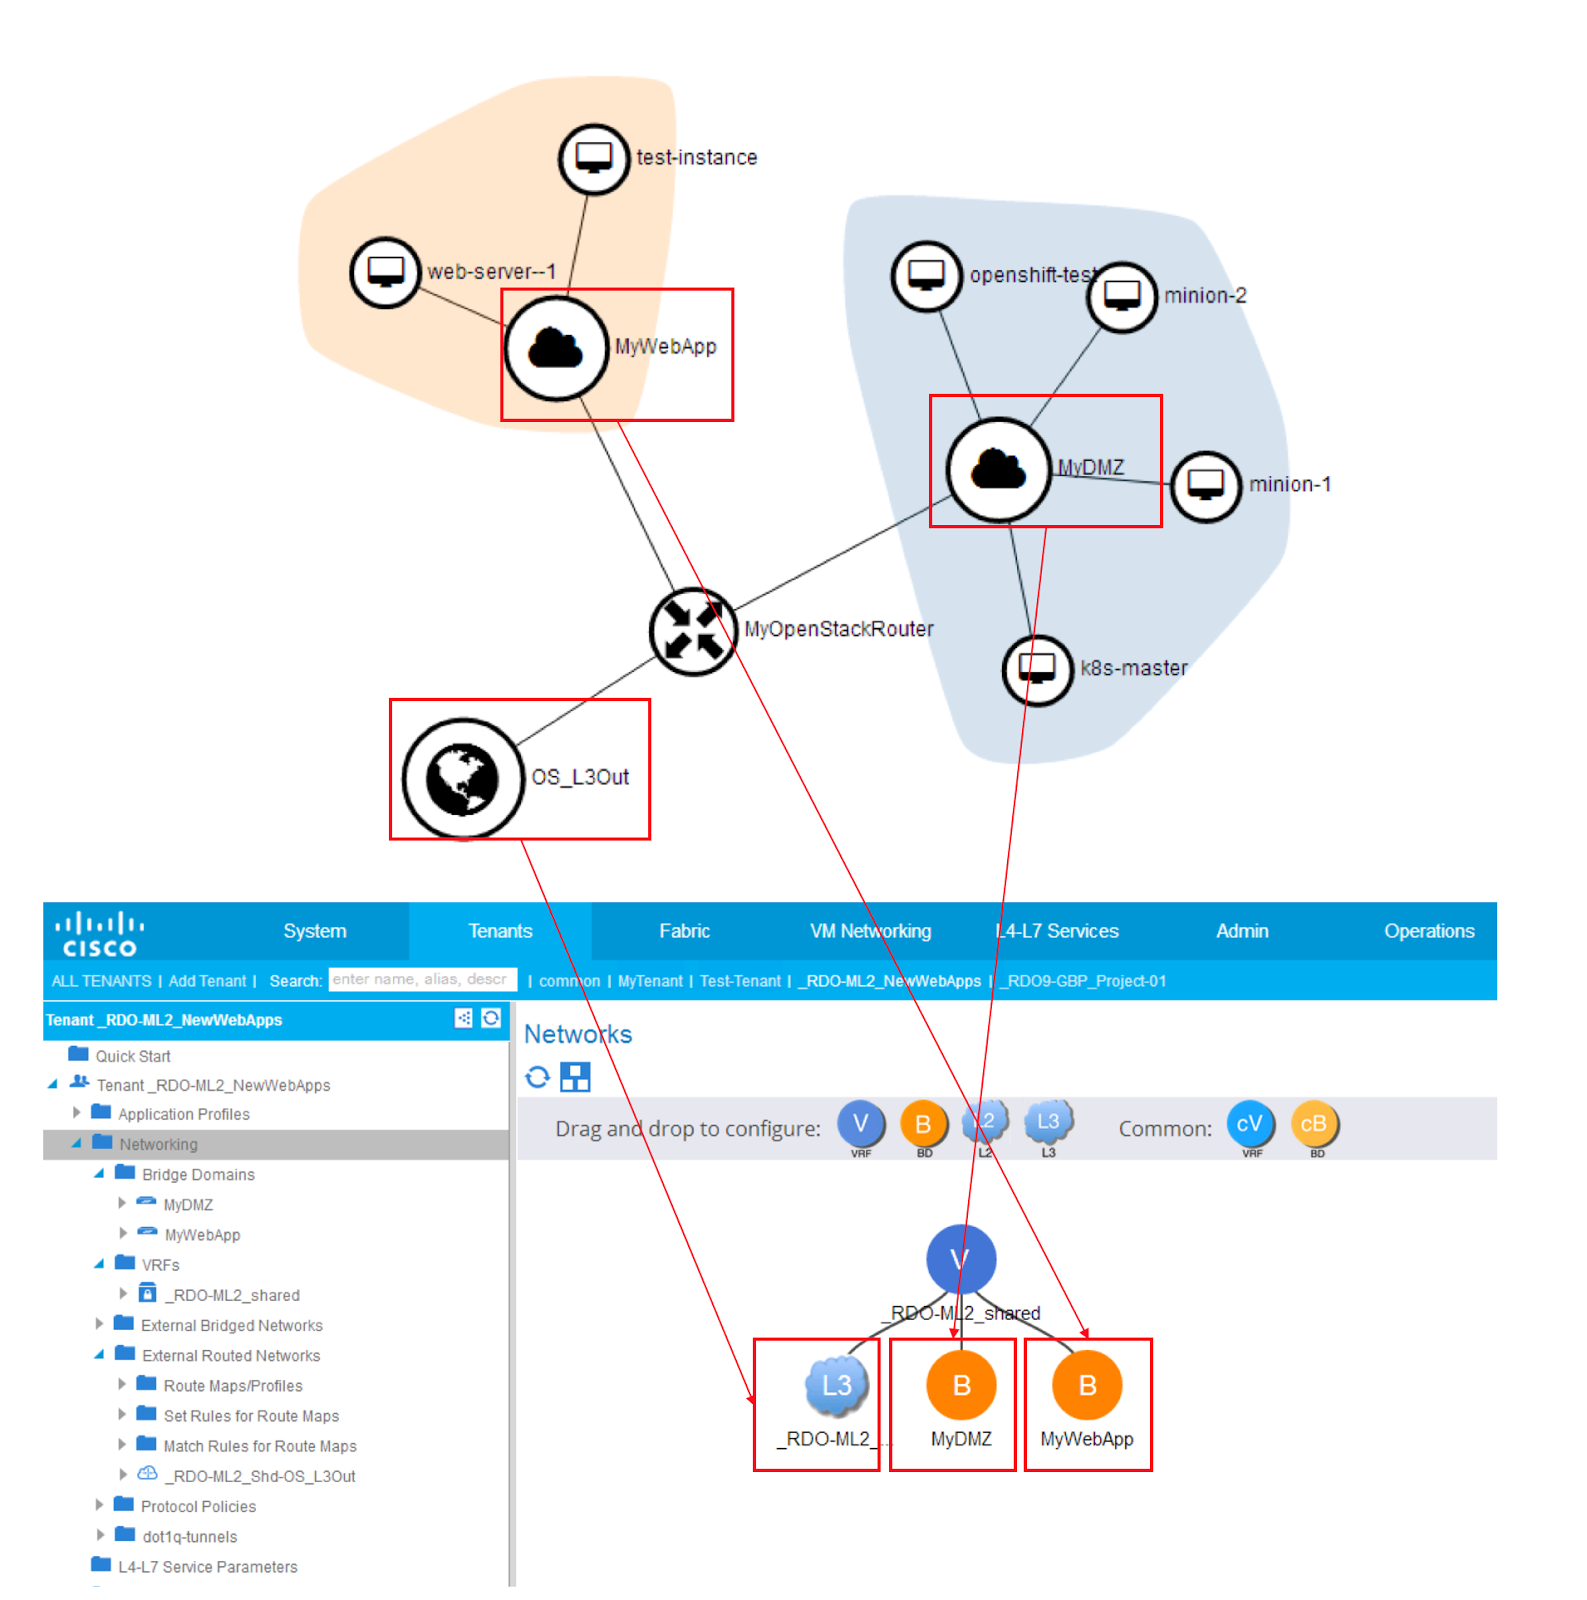
The neutron network topology from above is further represented by the following ACI Application profile where we can again see the connection to the shadow L3Out:

The neutron subnets are configured under the corresponding Bridge Domain. For instance, for MyWebApp we can see neutron network with subnet 10.100.100.0/24:

 |
So to recap once again, each neutron network will trigger the creation of a Bridge Domain and an EPG under the project/tenant VRF. The neutron subnet will be configured under the corresponding Bridge Domain, and if the neutron network is connected to a neutron router this will be simulated by creating a contract that allows all traffic and associating the corresponding EPGs with that contract.
Endpoint Connectivity in Detail
First let’s look at how instances can get their IP addresses. We have the following instances configured.

Understanding DHCP with OpenStack
If we look at our VMM Domain, we can see for each of the hypervisors the list of running virtual machines. For instance we see something like this for both centos-01 and centos-02:


We can recognise there some of our instances. However on centos-01 there are some additional endpoints that aren’t so obvious to identify at a first glance. For instance, those with VM name beginning with ‘dhcp|_RDO-ML2 ...’. Those are the endpoints that will allow us to run a dhcp server for each of the networks, and we will see one per neutron network.
Each of these dhcp instances will connect with its own network namespace in the linux hypervisor, for each of the subnets on which we are running DHCP. In our case, we see five networks. But why five? On our topology we had only three ...
… because on the neutron topology above we were looking at one project. But running the ‘neutron net-list’ command as admin, and on the VMM domain information we are looking at all tenants and there are additional networks configured for other tenants. Let’s focus on the dhcp endpoints and use ‘ip netns list’ to list on the centos-01 the list of network namespaces:

It is easy to correlate the neutron ID with the network namespace. For instance, MyWebApp has ID 6fccd59e-76e0-49de-9434-020fef1c22d9, and we can see the network namespace matching it: qdhcp-6fccd59e-76e0-49de-9434-020fef1c22d9.
We can look at the IP Address running on this namespace:

We can see interface ‘tap6ebbc085-b4’ running with IP address 10.100.100.2. That is the IP address and the tap interface that we see from the VMM domain as well. This IP Address is also seen in the fabric as just any other endpoint. We just need to check it on the corresponding EPG (in our case, MyWebApp EPG):

And we can see also on centos-01 what processes are using this if we type ‘ps auxwww | grep 6fccd59e-76e0-49de-9434-020fef1c22d9’. We will see as per below the dnsmasq process running for this namespace with the DHCP subnet 10.100.100.0 allocated to it:

So what happens here is that Neutron will use this dnsmasq process to obtain an IPv4 address for instances launched into that neutron network.
But we are running distributed DHCP, so … do instances talk to THAT dnsmaq process? … they don’t. We will see how this works soon.
Let’s first track one of our instance endpoints in the fabric.
Understanding OpenStack Instance Networking
If we look at the neutron diagram from above, we can see that in MyWebApp we have two instances, one called ‘test-instance’ and the other ‘web-server—1’. Let’s see in greater detail how these are connected and how they obtain their IP Address(es).
We begin by looking for the instance ID and the neutron ID. We can check this with ‘nova list’:

Now we may want to find out where these instances are running, on which hypervisor. One way to look at this from OpenStack is with ‘nova show’ command for a particular instance ID. On APIC we find the hypervisor for an endpoint by checking the VMM domain information, by looking at the EPG operational tab or - if you dont know to which EPG or project it belongs to - by looking for the endpoint with endpoint tracker. Let’s see them all together below:

To continue the example, let’s now focus on one instance. We will look for one that is running on centos-02 to make it simpler (looking at a node that is only nova compute node).
Let’s focus on the 'test-instance’, with IP address 10.100.100.17 that it is running on centos-02, our compute node (let’s remember that centos-01 is both compute node and controller).
We need to find out the neutron port ID for this instance. Let’s list the neutron ports using ‘neutron port-list’:

The neutron port ID for our instance is 43591b4f-8635-4ad6-b8d7-c6510dd618ee. We can look at the first few characters only (43591b4f-86) and find out the linux bridge in front of this VM. We can see this by using ‘brctl show’ and looking for a port that is named ‘qbr’ followed by the first characters of the neutron port ID:

On the output from above, notice that there are three Linux bridges, there will be one for each VM running on the host.
The Linux Bridge we are looking for is qbr43591b4f-86. This bridge has two ports:
- tap43591b4f-86: connects to our virtual machine test-instance virtual NIC.
- qvb43591b4f-86: this is one end of a vEth pair, the other end is on the integration bridge (bri-int) configured on the OVS.
To confirm that we are on the right track and for troubleshooting, we will start a ping from ‘test-instance’ to ‘web-server—1’ (from 10.100.100.17 to 10.100.100.14).
We can capture packets sent/received by the VM by using tcpdump on the tap interface at the KVM host (centos-02). For instance ‘tcpdump -i tap43591b4f-86 -n -e icmp’ where we can see that our ‘test-instance’ is currently pinging our ‘web-server—1’ instance:

That tap interface is very important, because this is where security groups are implemented using IP Tables.
But for now, we are only trying to see all data path elements between our VM and the OVS.
Where is this vEth qvb43591b4f-86 connected? we can complete the picture by looking at the command ‘ovs-vsctl show’ and matching the neutron port ID characters again.
We will see that another way would have been to look at the VMM domain information, where we see the OVS port under br-int to which the vEth for this instance is attached:

So we can confirm that the other end of the vEth from the VM uses port qvo43591b4f-86 on br-int.
Now we can see all components in the data path at the host level, and how we can identify them using APIC as well as the openstack CLI.
The following diagram puts it all together, where the centos-02 host connects to the fabric using an etherchannel based off physical NICs enp8s0 and enp9s0 over which runs our VXLAN interface that is the uplink of our br-int to the ACI fabric:

Understanding Distributed DHCP
Now we can look at how the 'test-instance’ VM managed to get its IP address delivered. The instance is configured to boot and use DHCP to get an IP address by default. We can monitor how our instance gets an IP address by using tcpdump again on the tap interface that we already knew:
‘tcpdump -i tap43591b4f-86 port 67 or port 68'

And that help us capture the request for an IP address, and the response from our DHCP server running on 10.100.100.2. Who is that server? Since we have distributed DHCP configured, that server is actually the ‘agent-ovs’ and we had seen it above before as the endpoint with name ‘dhcp|_RDO-ML2_NewWebApps|RDO-ML2|NewWebApp:

Let’s check the port-id on the OVS that corresponds to our instance. We know that the instance vEth is connected on OVS port qvo43591b4f-86. So we can find the id for that port with this command:
'ovs-ofctl show br-int'

The ID is 37. So we need to look for entries on the OVS OpenFlow table that use port ’37’. When the instance sends a DHCP packet, it will hit our OVS port and in there it will match this rule (notice we are looking for in_port=37 and matching on UDP 68):
What does this rule do? That rule will send the BOOTP packet to the controller, which is the agent-ovs running on the node.
So is agent-ovs running a DHCP Server? … Not exactly. The DHCP server runs on the dnsmaq process we have seen earlier. Neutron will leverage that to find the right IP address for the instance and the neutron-opflex-agent will receive what this IP address should be. The neutron-opflex-agent will create a file for each endpoint (neutron port) under '/var/lib/opflex-agent-ovs/endpoints/‘.
Let’s look at our endpoint’s file. Let us remember that the neutron port ID is: 43591b4f-8635-4ad6-b8d7-c6510dd618ee. On the centos-02 node, neutron-opflex-agent has created an endpoint file for this neutron-port:

As you can see on that file we will have all required information: IP address, default gateway, DNS server IP address, etc. It is from this file that ‘agent-ovs’ will collect the necessary information for the DHCP response. The response will be sent directly to the OVS port connecting to the VM.
We can correlate this information with the output of ‘neutron port-show 43591b4f-8635-4ad6-b8d7-c6510dd618ee’:

As well as with the metadata corresponding to the Nova instance which would be visible under ‘/var/lib/nova/instances/<instance-id>/libvirt.xml

Security Groups Implementation - IP Tables
One of the key differences between using GBP mode vs ML2 mode is the security model. In ML2 mode we leverage standard neutron security groups, implemented as IP Tables on the linux bridge tap interface.
Once again, we can use the ‘nova show’ command to look at the instance details, including the configured Security Groups:

This instance is part of two security groups: AllowPublicAccess and MyWebservers. Using the ‘neutron security-group-list’ command we can see what’s configured for those:

From there one, you can use regular IPtables troubleshooting. The rules are created by the neutron-opflex-agent and they can be identified, again, by matching on the neutron port ID characters we have seen before. For instance below you can quickly spot the rules of the MyWebServers security group for tcp/22, tcp/80 and ICMP:

On the next post we will look at NAT and Floating IP.
NICE Post
ReplyDeleteMarks4sure.com experts have devised a set of exam like 70-767 practice tests for the candidates who want to ensure the highest percentage in real exam.
ReplyDeletedo you have any latest post on Redhat Openstack and ACI Integration
ReplyDeleteAccording to Stanford Medical, It's in fact the ONLY reason women in this country live 10 years more and weigh on average 19 kilos lighter than us.
ReplyDelete(And actually, it really has NOTHING to do with genetics or some secret exercise and EVERYTHING to do with "how" they eat.)
BTW, I said "HOW", and not "what"...
CLICK this link to discover if this quick quiz can help you find out your true weight loss possibilities
Hi Nilo
ReplyDeletethanks for your explanation, it was very clear and i was success running this integration on rhosp13, but can we still using open vswitch and take out opflex agent ?
or maybe you've experienced integration aci + rhosp 13 also infoblox as dhcp and dns backend ?
I like to read your blog. You shared a wonderful information.
ReplyDeleteOpenstack Training